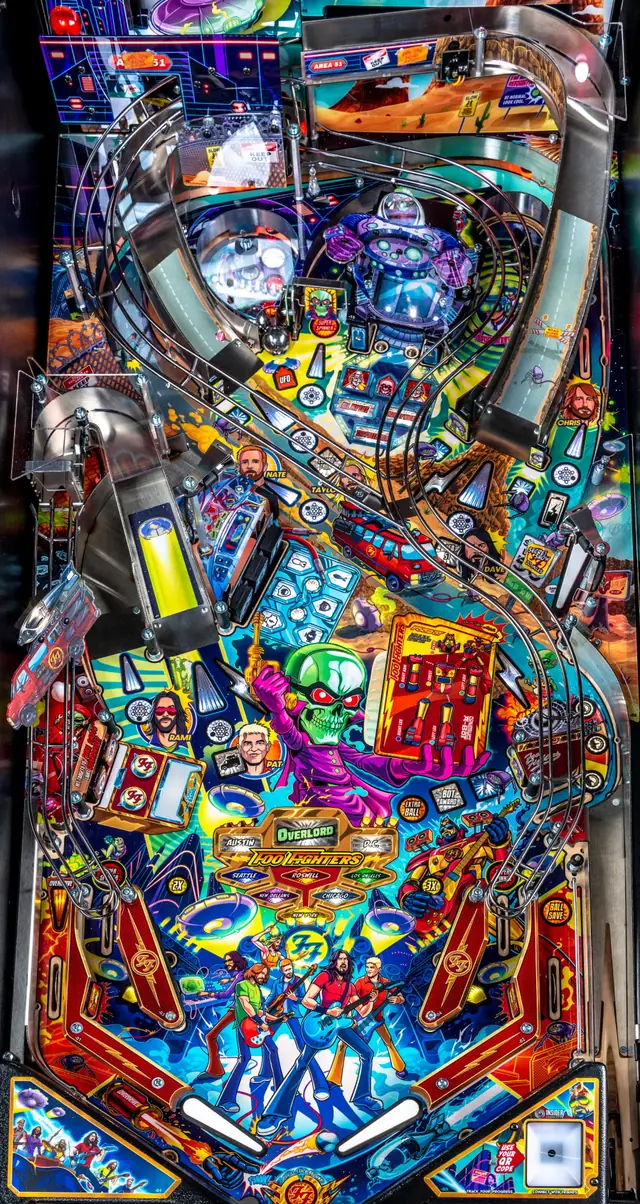
Silverball guide · Foo Fighters
One try is the only try that counts
Foo Fighters lets you finish a city across as many attempts as you like, and then quietly pays almost nothing for it. The whole machine is built around completing a mode first time, and around the preparation that makes that possible.
Finished and finished first time are different things
Van modes are the cities, started at the left ramp after spelling VAN on the white shots. Each needs up to fourteen shots and runs fifty seconds, with three more seconds added for every bit of progress you make. If you drain part-way through, you pick it up again later and can still complete it.
But completing a mode in one attempt scores more, and it is the only kind of completion that counts towards assembling the FooBot. It also sets the jackpot value in the Austin wizard mode, at half a million per one-try city.
That reframes the early game. You are not trying to tick off six cities. You are trying to be sufficiently prepared that each city falls in a single visit, which is what the next section is for.
Two smaller things that pay: the last shot of every mode is always the Overlord, and making it awards a time bonus worth one per cent of the mode total for each second remaining. And scoring more than fifty million in a single van mode upgrades a FooBot part.
Mod the van before you leave
Knock down all three drop targets and the MOD-ulator target behind them lights for ten seconds. Keep hitting it to level up whichever of the three mods is showing. The mod locks in the moment you knock down the first drop target, so decide while the inserts are still cycling.
Engine adds time to the next van mode, twenty seconds at base and ten more per level. Speakers add scoring. Bomb is the interesting one: it cuts two shots off the next mode at base and one more for every level on top, and when you make the final shot the points for the shots it skipped are paid anyway and count towards the time bonus.
A well-levelled Bomb turns a fourteen-shot city into something you can genuinely take in one visit, which is the whole argument of this guide. Mods first, mode second.
If you hit the MOD-ulator target without clearing all three drops, the targets reset and you advance your bonus multiplier instead. That is not a mistake worth avoiding, just a different reward.
The FooBot is a permanent multiplier collection
Six parts, and each is awarded by starting something rather than winning it. The head comes from starting Area 51 multiball, the chest from starting Combotron, the right arm from starting Bot Frenzy, the right leg from starting Supersonic Radio. The left arm comes from the Overlord multiballs, and the left leg from a fifty-million van mode.
Each part can then be upgraded by a performance threshold in the same feature: 25 million during Bot Frenzy, 25 million during Combotron, the radio jackpot at the end of Supersonic Radio, the super jackpot during Area 51.
The parts carry permanent shot multipliers, which is why this is worth doing early rather than treating it as a wizard-mode checklist. They stack with the ray gun multipliers, with the timed playfield multiplier and with the 2x jackpots in the Overlord multiballs.
The ray gun targets are free multiplier
The two ray gun targets sit at the return lanes and are hit by alley passing or shatzing the ball across. Do it and the next shot you make scores 2x. Hit the target on the other side immediately afterwards and the next shot scores 4x.
They relight simply by rolling through their own inlane, so this is a habit rather than an objective, and it costs nothing to build into ordinary play. Shots spotted by the action button are not multiplied, which is worth knowing before you spend a UFO button on a big shot.
There is a bonus for the left crossover: made with a multiplier active, it also applies to the next upper flipper shot, either the upper loop or the side ramp.
Overlord multiballs come in a fixed order and share a jackpot
All My Life, then Monkey Wrench, then The Pretender, and no progress towards the next one can be made until the current one has been played. Each is qualified by shooting the Overlord and the targets either side of it, then locking a ball there and beating the captive ball a set number of times.
The jackpot value is shared across all three and only ever goes up, built by hitting the centre Overlord target, by hitting the captive ball during multiball, and by the jackpots you score. That makes early Overlord work an investment in the later multiballs rather than a separate event.
The stacking rules are specific. Area 51 can be progressed and started during any Overlord multiball, so it is the one to bring in. Combotron can start during Area 51 and Area 51 during Combotron, but neither can start during an Overlord multiball.
Bot targets, and the three awards that loop
Four standup targets scattered round the playfield destroy spider-bots. Complete all four and the Bot Award target on the right lights, paying a bot bonus of 500,000 for every bot you have destroyed all game.
The awards run in a fixed cycle of three and then repeat: a ball save at the right outlane, MOD-ulator Frenzy at the paddle target, and Bot Frenzy at the left ramp. MOD-ulator Frenzy is the one to look forward to, because it cycles the van mods rapidly and lets you stack them fast, and if you start it during a van mode the boosts apply to the mode you are already in.
Bots destroyed also pay elsewhere. An extra ball lights at ten and again at thirty, the end-of-ball bonus pays 50,000 a bot, and Bot Frenzy starts with one second of ball save for every bot you have destroyed.
The playfield multiplier and the spinner
Roll through the Rock-O-Meter lane with the battery insert lit three times and 2x playfield runs for forty seconds. Do the whole thing again while it is running and it becomes 3x and the timer resets; do it a third time and you get ten more seconds. The Rock-O-Meter advances from skill shots into the lane and from the right orbit.
It gets harder every time. Eventually the battery itself has to be lit at the right orbit by shooting the MOD-ulator target, on a timer at the highest difficulty.
The spinner is a separate ladder. The four ramps raise its value, the tower adding the most at 100,000 a shot, up to 225,000 a spin with everything lit. Three trips through either return lane light super spinner at an inlane, which pays five times the spinner value for a short time. The value resets after a single rip, so line the two up together.
Where the cabinets differ
Area 51 is a different feature on each. On a Pro it is five shots to the right ramp, and the super jackpot is a right ramp into the UFO captive ball as a combo. On a Premium or LE the right ramp diverts the ball to an upper mini-playfield, where you complete the targets, the spinner, the loop and the secret files target at the back, and the super jackpot is collected up there behind a diverter. The Premium and LE also pay fresh jackpots worth half your best jackpot for thirty seconds after you drain out.
Overdrive, the left outlane save, is physical on a Premium and LE: the Deadpost raises and you hold the left flipper up quickly to catch the ball, then take any shot straight afterwards for a points award. On a Pro it is a virtual save, and it takes two Sonic Radio completions to relight the first time rather than one.
On a Premium or LE the upper playfield shots are mapped onto the side ramp and side loop for Combotron purposes, so the band member combos can be made either way.
Where this came from
Silverball wrote this, but not from scratch: it was compiled against the published rules below and checked against them, rather than written up from one person’s games. None of the wording is theirs. Machines get code updates that move the right shot, so a guide has a date on it for a reason.
- Foo Fighters community rule sheet (author not recorded in our copy)