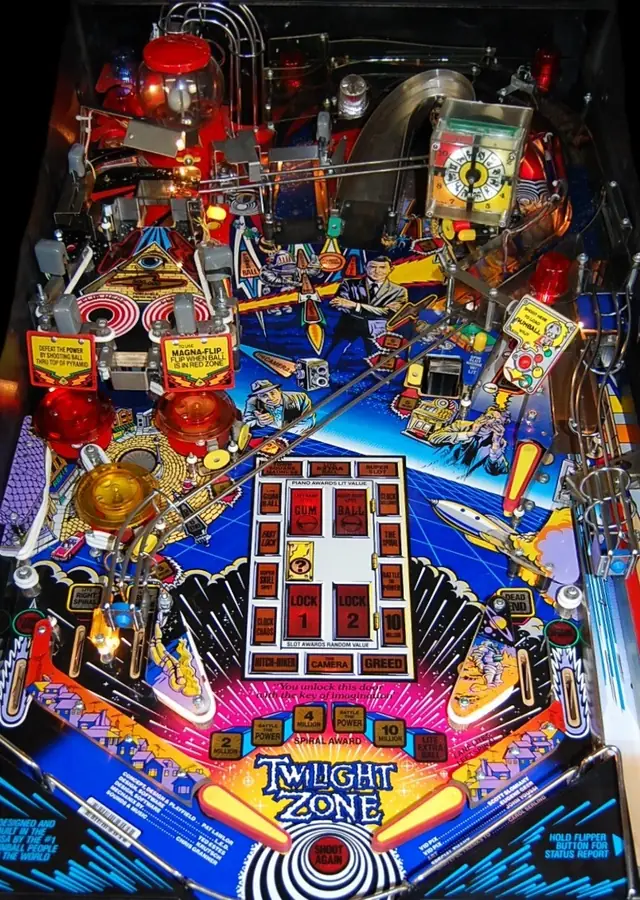
Silverball guide · Twilight Zone
Learn the ramp combo first
Twilight Zone always has six things lit and no obvious order to take them in, which is why most players wander. Almost every route through the machine runs through one combo, and learning it turns the game from noise into a plan.
Left ramp, then right ramp
The left ramp spots GUM and the right ramp spots BALL. Completing GUMBALL lights a lock and lights the gumball machine at the right spiral, which are the two front doors to the two biggest scoring routes in the game.
The same left ramp does three other jobs on the way past. It relights the Piano, which is where door prizes are collected. It scores a Robot, and enough Robots light an extra ball at Lock. And it returns the ball to the left flipper, so the combo can be run again immediately.
That is why this one shot pair is worth more practice than anything else here. Multiball, the Powerball and the door prizes are usually described as three separate strategies, and all three are fed by the same two ramps.
The machine does put a limit on it. Once the gumball machine has been lit by the ramps, it cannot be relit that way until you have made a lock, so you cannot simply stand there filling it up.
The Door is a menu, and the bumpers are the dial
Fourteen yellow panels surround the Door, plus the white handle in the middle, and each panel is a round or an award. Only one is lit at a time, and every jet bumper hit advances which one clockwise.
Clockwise from the upper left they run: Town Square Madness, X-Ball Lit, Super Slot, Clock Millions, Spiral, Battle Power, 10 Million, Greed, Camera, Hitchhiker, Clock Chaos, Super Skill Shot, Fast Lock, Lite Gumball.
You collect the lit one at the Piano, which starts every ball lit and is relit by the left ramp. The Slot Machine also hands out door prizes, but a random one rather than the lit one, and it will avoid the flashing panel unless it is the last one left. So the Piano is the shot you aim with, and the Slot is the one you gamble with.
This gives you real control, at a price. Working the bumpers to line up the panel you want means spending time in the jets, and the jets on this machine are notorious for firing the ball straight down the middle from close range. Steering the Door is worth it when you are near the handle, and often is not otherwise.
Do not take a free extra ball too early
One of the fourteen panels is X-Ball Lit, which lights an extra ball at the Lock target. That sounds like an ordinary award and it is not, because collecting an extra ball from any other source spots that panel for you.
The other sources are the Robot Ramp, Dead End, the Super Skill Shot, the Spiral and the outlanes, which is to say most of the extra balls you are likely to be offered. Take one of those before you have collected the X-Ball Lit panel and it is spotted rather than awarded, and you are one extra ball worse off than you needed to be.
So if the Door is anywhere near that panel and an extra ball is lit elsewhere, collect the panel first and the loose extra ball second. It is the single most avoidable loss in the game.
Both outlanes are worth watching for the same reason. Lite Outlanes puts an extra ball on the left and a special on the right, only one lit at a time and swapped by the slingshots, and both can be scored in the same ball.
Which door prizes are worth steering towards
Clock Chaos has no ceiling. The clock starts at six and runs backwards, each hit on the Clock Target stops it and reverses its direction, and the round only ends when the clock reaches twelve on either side, with a short grace period there. It gets very fast after three hits. Our source reports taking 105 million from one.
Clock Millions pays the hour showing on the clock, so hitting the target immediately is worth twelve million and waiting is worth one. Five hits adds a ten million Clock Damage bonus and six adds twenty.
Town Square Madness makes every playfield target worth 350,000 from a three million base, and each jet bumper hit raises the per-target value by 25,000. A poor round is under ten million and a good one is over forty.
Greed lights the seven five million targets and banks five million for each one you hit. The two to be less pleased about are 10 Million, which is exactly that, and Hold Town Square, which merely stops your town square value decaying.
The crucial thing about most of these is that they do not pay when you finish them. Clock Millions, Clock Chaos, Greed and Town Square Madness are all added to your end-of-ball bonus, which is the subject of the next section.
The bonus is where the game is actually won
The routine part of the bonus is small: 500,000 for each Hitchhiker pickup and 500,000 for each door prize, multiplied by the bonus multiplier. Our source is blunt that chasing the multiplier is a waste of a shot.
The special rounds are the part that matters, and they are added on top of the multiplied figure rather than inside it. The rough ceilings are 70 million from the accumulated Battle the Power rounds, 70 from Clock Millions, 50 from Town Square Madness, 50 from Clock Chaos, 30 from Greed, and up to 300 from Powerball Mania. That is a 570 million bonus on a machine whose default grand champion score is 750 million.
Two consequences follow and both are severe. First, do not tilt, because Powerball Mania is part of the bonus and tilting throws it away. Second, the Camera's Collect Bonus award pays your bonus immediately, which makes it potentially the largest single award in the game rather than the dull one it looks like.
The Camera is lit by the Door and by every ten Robots, awards stack, and they carry between balls. The Door lights two of them at once.
The Powerball is the highest-scoring route
It never takes more than three gumball machine shots to bring the Powerball out, and the machine is relit quickly by the two ramps. Loading the Powerball into the gumball machine starts Powerball Mania, and that round is worth more than anything else on the playfield.
Mania is a three-ball multiball. Every playfield target is worth 250,000 while the clock rolls, and the right ramp is lit to feed balls onto the Powerfield. Each ball you put up there buys five seconds of magnet play, and with a little luck you can have all three up at once. Defeating the Power pays a fifty million jackpot, and if a second ball is on the Powerfield at that moment it can be shot in for another fifty.
After a jackpot the right ramp will not reload the Powerfield until you relight it with a left ramp shot. There is a brief ball saver at the start, so an early drain is usually returned.
While the Powerball is loose on the playfield everything still works except the magnets, so Battle the Power is disabled for the duration. The left spiral pays a ten million Powerball Loop instead. Our source is clear that shooting the Powerball into Lock to carry it into ordinary multiball is a poor trade against a big Mania round.
Battle the Power, and the technique that works
Three Hitchhiker pickups light Battle the Power, and every ten after that lights it again. The right ramp then feeds the ball onto the magnetic mini-playfield above the bumpers.
A round starts at five million, and each of the three walls you hit pays 500,000. Win once and the walls are worth 750,000 in later rounds; win twice and they are worth a million, which is the limit. Twenty wall hits in ten seconds is a typical losing effort.
Winning does two things beyond the points. It doubles that round's Powerfield total, and it immediately awards whatever door prize is currently lit, which is a second reason to have steered the Door before you go up there.
On technique, our source tried several and found one most reliable: flick a magnet on and off to build momentum in the ball, then release it and let that momentum carry the ball up towards the hole rather than trying to aim it. Keep shooting when the timer expires, because there is about a second of grace and a late winner still counts.
Multiball: lock the second ball
Completing GUMBALL lights the first lock. With one ball locked the display offers you a jackpot of fifteen million, and either Lock or the left ramp will start multiball. Lock the second ball instead and the jackpot becomes forty million.
That is the decision, and it is not close. Starting early to bank a fifteen million jackpot costs you twenty-five million and the base value everything afterwards is built from.
The jackpot is at the Piano and is lit immediately. While it is lit the seven five million targets flash and each one adds five million to the jackpot, so a scrappy multiball can still build a large one. Relighting the jackpot means shooting the Camera, which needs both flippers at once and is the hard part of the mode. Each relight starts ten million above the previous starting value.
Miss the jackpot entirely and you have twelve seconds to restart at Lock, which gives you three fresh balls and keeps the jackpot value. There is no third chance. The second multiball requires both locks lit separately, so GUMBALL twice, and cannot be started from the left ramp at all.
Lost in the Zone
Collect all fourteen door panels and the white handle lights. That is the wizard mode, and our source refuses to describe it in the main text at all, hiding it in a spoilers appendix.
Every ball in the machine comes out, from the gumball machine and the trough alike, and almost everything is lit at once: the Powerfield with a fifty million win, Town Square Madness, Clock Millions, Super Slot, the Greed targets, Dead End and Town Square together, Hitchhikers at two million and left ramps at ten.
Only points scored during the round count, and it ends the instant the clock strikes twelve, at which point everything stops and every ball drains. A good one is upwards of 300 million, and the best goes onto its own high score table.
The route there is the whole reason to steer the Door with the bumpers rather than take whatever happens to be lit.
A note on the age of this source
This sheet was written in 1993, close enough to the machine's launch that it discusses prototype cabinets, tournament settings for that year's trade show, and a purple dinosaur that shipped as a groundhog after a lawsuit. It compares P-ROM values against L-2 values and describes a gumball machine fault that later ROMs fixed.
Take the shot map and the structure as reliable, because neither has changed. Treat specific values with more care: several are explicitly operator-adjustable in the source itself, including how many Robots light an extra ball and how many Dead Ends do.
A Twilight Zone on a UK floor today may well be running later code than the machine this was written against, and the machine you meet may have had its gumball machine disabled, which turns Lost in the Zone into a three-ball multiball rather than a six.
Where this came from
Silverball wrote this, but not from scratch: it was compiled against the published rules below and checked against them, rather than written up from one person’s games. None of the wording is theirs. Machines get code updates that move the right shot, so a guide has a date on it for a reason.
- Twilight Zone rule sheet, signed “Bowen” (surname not recorded in our copy)