Silverball guide · Jurassic Park
Do not rescue everybody
Jurassic Park asks you to save the park staff and catch the dinosaur, and it is entirely possible to do the first so well that the second becomes impossible. The staff are bait as much as they are points.
The staff are bait
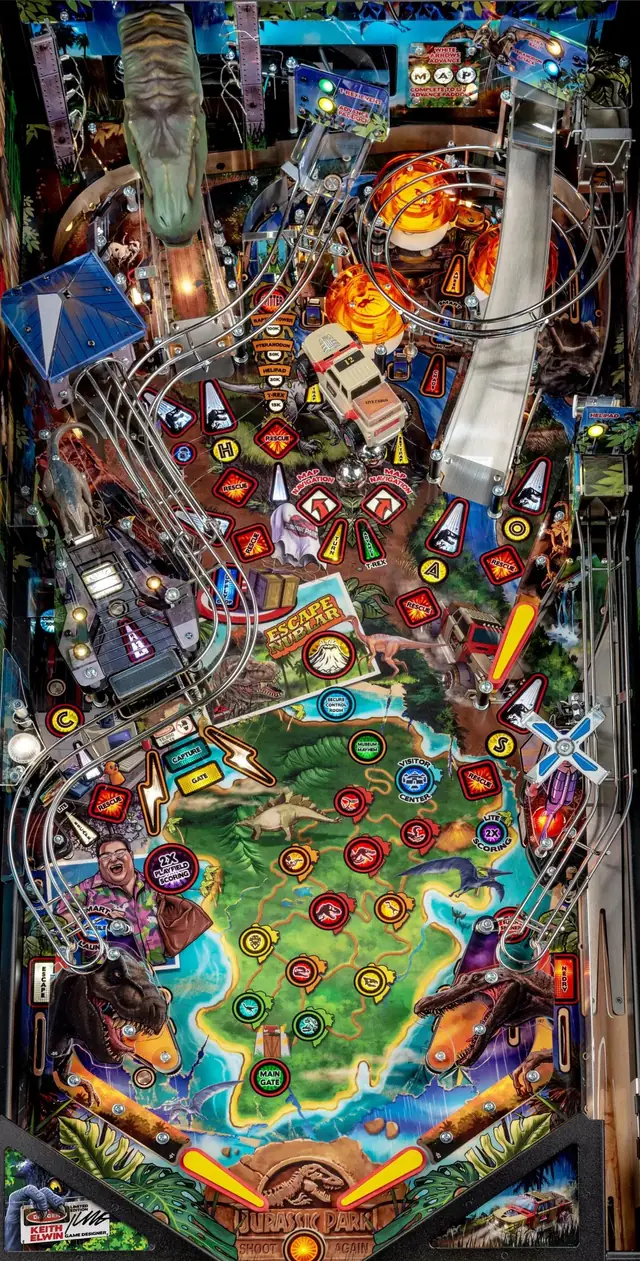
In every paddock a green arrow marks the dinosaur and red arrows mark staff in danger. The dinosaur walks towards the nearest lit rescue. You shoot the red arrows to save people, then set the trap, then take the flashing shot to capture the animal.
Here is the rule nobody reads until it costs them a game. If every member of staff in a paddock has been either rescued or injured, the dinosaur turns round, walks back to where it started and escapes, and you get none of its bounty, none of its perks and none of its Amber multiplier.
So the rescues are not simply points to be hoovered up. You need somebody left on the playfield to hold the animal's attention while you complete the Set Trap targets and line up the capture. Spread your rescues out, and leave the far ones alone until the trap is ready.
Two things help you stall it. Shooting the dinosaur's own shot pauses its pursuit for a few seconds even when no rescue is lit there. And the Super Tranquilizer, earned from side ramp awards and fired with the action button, stuns it outright for a moment. It has to be requalified after every single use, so save it for the shot that matters.
The reward for a clean paddock, and the tension with the above
Clear a whole paddock without missing a single rescue and you take the Perfect Paddock bonus: double the paddock's bounty and an extra 1x on your Amber Bonus multiplier. It is a real prize and it pulls in the opposite direction to the escape rule.
The way to have both is sequencing rather than speed. Rescue the staff the dinosaur is walking towards, ignore the ones it is walking away from, and keep the trap work going in between rather than saving it for the end.
One mercy is built in. If there is nobody left in the paddock but you still need rescues to set the trap, the trap targets light anyway, giving you a short window to capture the animal and take its perk.
Every dinosaur is a permanent perk
Capturing a dinosaur pays an immediate bounty, a multiplier on your next Amber Bonus, and a perk that lasts the rest of the game. The truck steers you between the left and right paths on the map, and the Super Predators up the middle can be skipped or sought deliberately, which is a scoring choice rather than a matter of course. Capturing a Super Predator raises your bonus multiplier.
The perks are not decoration. The Ankylosaurus lowers every Light Inlanes threshold by one rescue. The Triceratops changes loop awards from every fifth loop to every fourth, and it applies to all later increments too. The Spitter adds 2x to super spinner. Capturing the T-Rex awards an extra ball outright.
Since the perks compound over the rest of the game, an early paddock is worth more than a late one, and a paddock captured is worth far more than a paddock survived.
The Amber Bonus, and the multiplier you are about to waste
The bumpers build the Amber Bonus for the entire game. You collect it at the pops standup, lit by rolling through the lane above the bumpers, and collecting does not reset it. It relights and keeps growing from where it was.
The multipliers are the part that needs managing. Each dinosaur captured adds one to your next Amber collect, Perfect Paddocks add another, and they stack until you take it. But the end-of-ball bonus collects the Amber Bonus too, and that spends your stacked multiplier whether you meant it or not. It does not carry to the next ball.
So collecting Amber is a decision with a deadline. Build a stack of multipliers, then deliberately go and take it rather than letting a drain cash it in for you. Completing Fossil Set 3 adds a 10x to the next collect, which is worth lining up rather than stumbling into.
The skill shot is a four-shot combo
Full plunge, then left ramp, right ramp, side ramp, right orbit, in that order. The base is two million and the shots pay 2x, 4x and 6x as you go, each adding three seconds of ball save. Complete all four and Escape lights at the left outlane.
Making any skill shot raises the base by a million for your next ball, so this compounds across a game rather than being a one-off. There is a variant too: put an upper loop in immediately before the side ramp and the side ramp scores 8x instead of 4x.
There are quieter ones for when you would rather not gamble the ball. Plunge softly onto a flipper and take the C lane for six million, the O lane for eight, or the pops standup for ten, and twenty million from the right flipper along with twelve seconds of ball save.
Smart Missile is a menu, and two options are the whole game
Collect enough rescues and the left inlane lights for Smart Missile. The up-post catches the ball, and you have three seconds to cycle the awards with the action button before shooting the target between the bumpers. It pays ten million on top, rising five million for each missile launched this game.
Clear Paddock finishes an entire paddock in one shot, escape rule and all, which is the get-out-of-jail card for a paddock going badly. Super Combos makes every combo score 5x for the rest of the ball, which is the one to take when things are going well.
The other slots hold rescues, an instant Raptor Tri-Ball, an extra ball, a wildcard fossil and Super Escape. Abort is there too, and requalifies with two shots to the truck, so an unwanted menu is not a wasted inlane.
Stack the modes, and finish them fast
Completing any single-ball T-Rex event or Control Room mode awards a fossil and a time bonus worth a million for every second left on the clock. Speed is paid directly, which is unusual and worth remembering when you are tempted to cradle up and think.
They also stack. A non-multiball T-Rex event can run alongside other non-Control Room modes and one multiball, and a Control Room mode can run alongside non-T-Rex modes and one multiball. The machine is happy to have several things going at once and rewards you for arranging it.
Control Room is lit by capturing your first dinosaur, by spelling CHAOS twice, by a jackpot in Raptor Tri-Ball, or by fifteen tower shots. Four routes to the same door, and the tower one runs in the background of everything else.
Chaos Multiball is about the truck
In the first phase, jackpots are lit on one half of the playfield only, and which half depends on which way the truck is pointing. Hitting the truck flips it and lights the other side, including shots you had already collected.
The temptation is to keep switching. The rule says otherwise: the more jackpots you collect on one side before you switch, the more each is worth, and the larger the super jackpot they build towards. Five super jackpots across your attempts opens the second phase, where the five letter shots pay what their supers were worth.
One last detail with real money in it. The Chaos Hurry-Up at the end of phase two is doubled if the truck is facing left when you collect it. Point the truck before you take the shot.
Fossils, and the modes you only get once
There are eleven fossils in four sets, worth two million each in bonus, and each completed set pays something specific: Set 1 puts an instant 10x on your next Pteranodon Attack, Set 2 awards an extra ball, Set 3 puts 10x on your next Amber Bonus, Set 4 spots ten rescues. They accumulate from things you were doing anyway, which is exactly why they get forgotten.
The three mini-wizard modes, Visitor's Center, Museum Mayhem and Secure Control Room, give you one attempt each. There is no second go, and all three are required for Escape Nublar.
Visitor's Center pays a bonus before it even starts, built from your fossils, rescues, longest rescue streak and DNA combos, all multiplied by the number of paddocks you visited. That is the clearest statement the machine makes about what it wants: a long route, played cleanly. Inside the mode, resist grinding a shot that has drifted back to you, because a repeat is worth half of what it paid last time, and then half of that.
Where the cabinets differ
The Premium and LE have the animatronic T-Rex actually take the ball at the left ramp during a T-Rex event; a Pro holds the ball with the left inlane up-post through the same introduction. In Museum Mayhem the Premium and LE T-Rex then throws the ball back out in a random direction.
The raptor pen can physically trap a ball on a Premium or LE and cannot on a Pro. In Raptor Tri-Ball that means the Premium and LE can reset the fifteen-second double-scoring window by hitting the now-captive ball, while a Pro gets the doubling but no lock. Visitor's Center adapts the same way: on a Pro, simply hitting the raptor pen counts in place of trapping a ball there.
Everything else in this guide reads the same on all three.
Where this came from
Silverball wrote this, but not from scratch: it was compiled against the published rules below and checked against them, rather than written up from one person’s games. None of the wording is theirs. Machines get code updates that move the right shot, so a guide has a date on it for a reason.
- Jurassic Park community rule sheet (author not recorded in our copy)