Silverball guide · Metallica
Four features, one counter
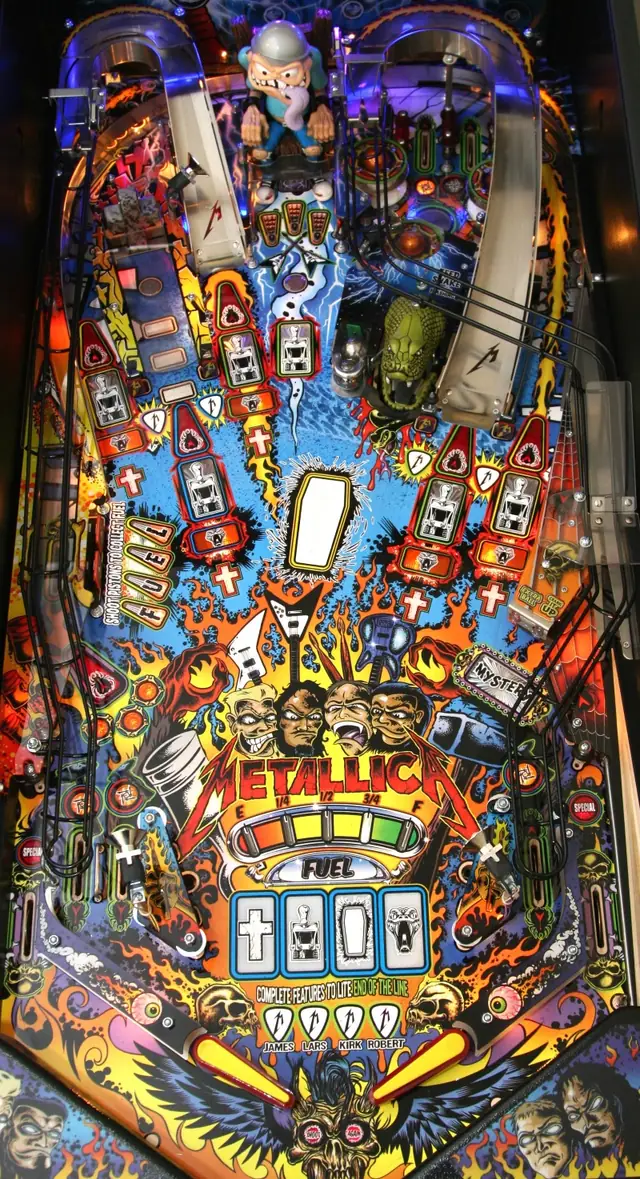
Sparky, the snake, the coffin and the grave markers look like four separate things to shoot. They are one counter, and filling it is how you reach the only modes that pay properly.
The whole game is a shopping list
Electric chairs, grave markers, snakes and coffins are collected as items, and twelve of them in any combination lights the scoop for Crank It Up. Each subsequent Crank It Up costs one more than the last.
That is the spine of Metallica. Everything else on the playfield is either a way of adding to that count or a way of surviving long enough to spend it.
The blue arrow is the part that separates good players from the rest
Three of the four items can be collected without shooting the feature at all. Hit the electric chair and an electric chair insert lights at one of the five major shots. Which shot it lands on is decided by the light blue arrow, and the arrow moves as you hit features.
So the shots stack. Once a shot carries a chair insert and a cross insert, every ball you send there pays a chair and a marker at once. Get all three inserts onto one shot and the next time you hit it, a Coffin Hurry-Up starts. This is why a player who seems to be shooting one lane over and over is ahead of you.
Coffins are the exception, and they are the slow one
Coffins can only be collected by hitting the captive ball directly. There is no insert route for them. The compensation is that hitting the coffin as part of a combo awards extra coffin hits, scaled to how long the combo was.
Since coffins are the item you cannot shortcut, they are usually what is holding your count back. If you are one or two short of Crank It Up, it is worth checking whether it is coffins you are missing before you go hunting for the snake again.
Crank It Up, and the choice at the scoop
Shoot the lit scoop and you pick one of four modes you have not played yet, or take a consolation score instead. The mode runs for as long as its song, so there is no need to rush, but the ball save covers only the first few seconds.
The job in the mode is to shoot the flashing shots and then cash out at the scoop. Making enough shots pays a completion bonus of fifteen million plus a rising amount for each mode you have started, and then lets you keep going for victory laps.
Collect or continue
During a mode, making a direct shot to each of the four main features lights the scoop for a decision: the left flipper collects the jackpot you have built, the right flipper keeps the mode running.
There is a second bite. Once you have cashed out, making all five arrow shots and then the scoop re-collects a quarter of what the jackpot was. That stays available until the ball drains or the next Crank It Up is lit, so it is worth knowing about on the ball where everything goes right.
The free multiplier during any multiball
There are four multiballs and three of them cannot run together. Whichever you are in, completing the four pick targets lights the snake for a timed lock and doubles the playfield for twenty seconds.
The first time you score that lock in a multiball it also adds a ball and starts a ball save. Completing the picks again while a ball is still in the snake resets the twenty seconds rather than wasting it. Doubling a multiball is the cheapest scoring on the machine and it is sitting on a four-target bank.
Sparky
Ten hits on the electric chair lights the chair inserts at the major shots and starts Electric Chair Multiball. The two shots either side of Sparky are worth one hit each, and the target between them is worth two, so the middle is the efficient route.
Every subsequent Electric Chair Multiball costs three more hits than the one before.
FUEL, and the target behind the targets
Four hits on the FUEL side target advances the gauge printed in the middle of the playfield and lights the dead end target behind it for double playfield scoring. That alone justifies shooting FUEL.
Fill the gauge completely and the next FUEL shot starts the frenzy, where every switch in the machine pays, and shots to FUEL keep adding both value and time. It ends when the gauge empties, with a generous grace period.
Resurrect, which is your outlane insurance
Knocking down the inline grave marker drop targets lights the outlane saves. On default settings three drops will do it, and using one save leaves the other still armed for the first resurrect.
Each time you light it, the number of drops needed goes up by three, to a maximum of fifteen. Hitting a grave marker drop as part of a combo counts for more than one, which is the only realistic way to keep re-arming it late in a game.
Where this came from
Silverball wrote this, but not from scratch: it was compiled against the published rules below and checked against them, rather than written up from one person’s games. None of the wording is theirs. Machines get code updates that move the right shot, so a guide has a date on it for a reason.
- Metallica Remastered rule sheet (author not recorded in our copy)