Silverball guide · Stranger Things
Win the chapter the hard way
Stranger Things pays you for finishing a chapter and pays you considerably more for finishing it under the specific condition it never quite tells you about. Those drawings decide what the three wizard modes are worth before you ever reach one.
Drawings, and the condition attached to every chapter
Each drawing you collect adds ten million to the jackpot paid at the start of Send it Back, Light the Fire and the Final Showdown, and two million to your end-of-ball bonus. Eleven of them in one game lights an extra ball.
Completing a chapter awards one. Completing it under that chapter's own restriction awards two, and the restrictions are specific enough that they change how you play the mode. Find Barb on your very first shot and you take forty million and the extra drawings. Beat Bullies by taking the four shots in the order right ramp, left ramp, right orbit, left orbit. Get through Get Me Out! using only the drop targets, which is also the highest-scoring way through it.
The other sources are worth collecting deliberately rather than by accident: the MXV skill shot, completing any Demodog Attack, a super jackpot in Telekinesis Multiball, and 130 pop bumper hits.
The consequence is that a game which rushes twelve chapters and a game which plays eight of them properly can end with very different numbers on the same wizard mode.
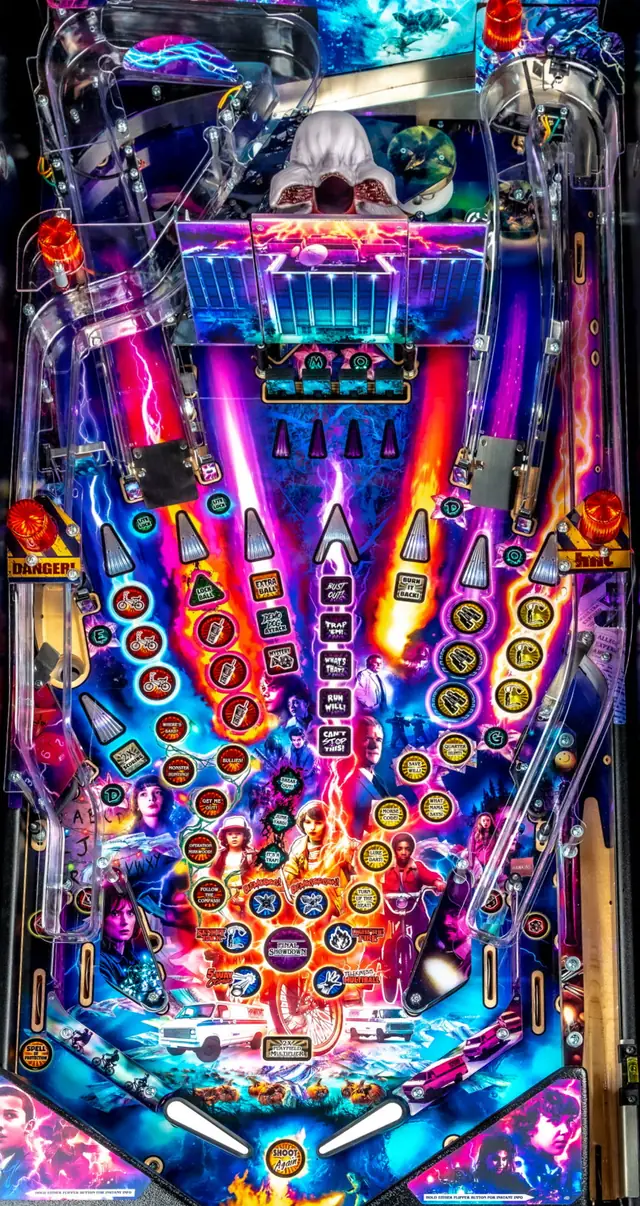
Six inserts above the flippers are the entire game
Left to right they read 5-Way Combo, Send it Back, Demodog!, Demogorgon!, Light the Fire and Telekinesis Multiball. Each lights solid when its task is done, and all six lit is the only route to the Final Showdown.
Two of them are chapter work. Send it Back needs all six Season 1 chapters played, Light the Fire needs all six from Season 2, and each then starts at the left ramp. Demodog! needs all three Demodog Attack modes, Demogorgon! needs all five Demogorgon modes, and Telekinesis needs a super jackpot in its multiball rather than merely starting it.
Reading the game as a checklist of six rather than a pile of modes is what turns it from chaos into a plan, and it is why the mode you skip early is the one that stalls you late.
The 5-Way Combo and the shots that kill it
Five shots, each within a few seconds of the last. Only four shots can be strung together freely: the left orbit, left ramp, the Burn it Back inner loop and the right ramp, in any combination including the same shot five times.
The saucer, the left standup lane, the centre behind the drops and the right orbit can only ever be the last shot, because making any of them ends the combo. It can be collected during a multiball provided those rules hold.
It is worth doing early. Scoring it adds ten million to your end-of-ball bonus for the rest of the game, not just that ball, and it is one of the twenty mystery awards, so a lucky roll can hand it over.
One trap: while ball lock is lit, the timer between combo shots appears to keep running while the up-post holds the ball, which makes the left ramp a poor choice mid-combo.
Burn it Back is the cheapest thing on the machine
The Burn it Back loop counts up across the whole game and hands out three separate things. An extra ball arrives somewhere between one and ten loops, and again at fifty. Spell of Protection lights at three, twelve and twenty-five loops, then every fourteen. 2x Scoring lights at seven, eighteen, then every fourteen. After the early awards the two simply alternate.
Spell of Protection is a left outlane save, which on this machine is close to an extra ball in value, and relighting it when it is already lit raises what it pays. 2x Scoring is taken at the saucer and runs for sixty seconds.
Both come from a shot you can make repeatedly in ordinary play, which is exactly why they get neglected. If nothing is lit and you do not know what to shoot, shoot this.
Stacking, and the order it has to happen in
Chapters cannot be started during Telekinesis Multiball, so a chapter has to be running before the multiball begins, or be started with the very same shot. Get that wrong and you spend the multiball scoring nothing towards your six inserts.
The three-way stack has a required order: start a chapter, then start a Demodog Attack, then start Telekinesis Multiball. Chapters cannot be started while a Demodog mode is running, but a chapter already going will keep running underneath it, which is what makes the sequence work in that direction only.
Stacking Telekinesis onto a single-ball Demogorgon mode is a worse idea than it looks, because the raised ramp in front of the Demogorgon sits between you and both the mystery target and the Burn it Back shot for the duration.
The Demogorgon bomb: one per game, and one right place for it
During any Demogorgon mode the action button flashes red. Pressing it kills the Demogorgon immediately for a reduced value, and you get exactly one in a game.
In the two multiball Demogorgon modes it does something better than kill: it locks in the jackpot value, and it does not reduce the super jackpot at all. That makes Trap 'Em! or Run Will! the place to spend it.
The place not to spend it is Bust Out!, a single-ball mode whose best outcome is fifteen million for a clean mouth shot. Using the only bomb in the game to shave a few seconds off that is the most common way it gets wasted.
The bonus is not an afterthought here
Bonus carries over between balls and is built from things you did earlier in the game: ten million if you have made a 5-Way Combo, two million per Demogorgon mode started, five million per Demodog Attack, three million per Telekinesis Multiball, two million per drawing, and ten per cent of everything you scored during chapters this ball.
All of that is multiplied by Bonus X, which climbs 1x at a time on even-numbered completions of the return lanes and caps at 5x. The lanes cycle with the flippers, so this is a matter of paying attention rather than aiming.
If you have had a productive game, deliberately working the lanes towards 5x is worth more than another go at a mode. Bonus Hold turns up in the mystery award and carries the multipliers to the next ball, and taken on the last ball it pays the bonus twice.
The Upside Down arrives uninvited
At random points, driven by switch hits, the game flips into the Upside Down and you shoot the centre drop targets to escape. Every other one requires the major shots instead.
It is not an interruption to be endured. Upside Down 1 puts a hurry-up on the drop targets starting at 7.5 million which does not reset between shots, worth up to thirty million if you clear them quickly. Upside Down 2 lights the ramps and orbits for a ten million hurry-up with a multiplier that climbs to 4x on the final shot, and comboed carefully it is worth eighty to ninety million.
Chapters and Telekinesis Multiball can still be started during Upside Down 1, but not during Upside Down 2. Upside Down can also arrive in the middle of a chapter, which is the best version of it.
Where the cabinets differ
The Premium and LE have Swipe-a-Ball. With balls already locked for Telekinesis Multiball, pressing the action button during a different multiball pulls one out and adds it to the multiball you are in. There is no limit on how often you use it, at the cost of needing another left ramp shot to re-lock afterwards.
The Telekinesis super jackpot is doubled differently too. On a Pro you lock a ball at the left ramp for twenty seconds to double it. On a Premium or LE you can hold up to two balls on the magnet for 2x or 3x, and that pays more drawings as well: two for a 2x super jackpot, three for a 3x.
Everything else in this guide reads the same on all three.
Where this came from
Silverball wrote this, but not from scratch: it was compiled against the published rules below and checked against them, rather than written up from one person’s games. None of the wording is theirs. Machines get code updates that move the right shot, so a guide has a date on it for a reason.
- Stranger Things community rule sheet (author not recorded in our copy)